
TM 5-3805-280-10
Rod
changer
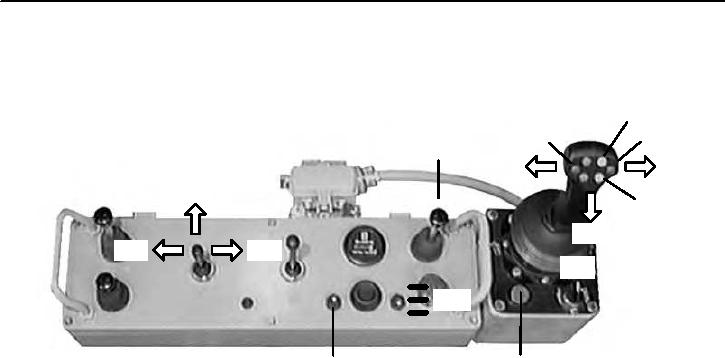
LOADING THE CAROUSEL (MANUAL MODE S0)
M5
M1
M4
E
K1
K3
B2
M2
K2
B3
B4
S0
J1
G
L
Loading the carousel with rods necessitates the
11) Perform steps 4 through 10 until the carou-
presence of 1 or 2 assistants depending on the rods
sel is loaded with 4 extension rods (do not perform
weight.
steps 9 and 10 after loading the last extension rod).
12)
Make sure the centralizer is open (switch
Make sure that any hand signal will be perfect-
E).
ly understood.
13)
Raise the dusthood (switch G).
The CPA should be lowered in its rest position to
load the rod.
14) Place the starter rod with a coupling into the
centralizer. Close the centralizer onto the coupling
1)
Place the HP / Dust collector switch on posi-
(switch E).
tion J1 (middle).
15) Feed the drifter down to the centralizer end
2)
Select the manual mode (mode selector in
of the drill guide (feed lever in B3 direction).
S0 position).
16) Screw the drifter shank into the coupling
3)
Check the indicator (L) is alight. If not,
(rod changer lever in K2 direction).
depress M2 or M5 button to rotate the carousel.
17) Open the centralizer (switch E). Feed the
Release the button when the indicator (L) is
drifter back (feed lever in B2 direction) until the cou-
alight.
pling is above the centralizer. Close the centralizer
4)
Swing the rod clamp arms towards the
(switch E).
guide (rod changer lever in K1 direction).
18) Feed the drifter back (feed lever in B4 direc-
5)
Open the rod clamps (depress M4 button).
tion) until the rod threads are bellow the dust hood.
Screw on a bit to the rod. Retract the drifter so that the
6)
Mount a coupling on the rod to be loaded.
bit enters inside the dusthood (feed lever in B2 direc-
Place the rod into the rod clamps.
tion).
7)
Close the rod clamps onto the rod (depress
M1 button).
8)
Swing the rod clamp arms into the carousel
(rod changer lever in K3 position).
9)
Open the rod clamps (depress M4 button).
10)
Depress M5 button to rotate the carousel.
Release the button when the indicator
(L) is alight.
7-46