
TM 5-2420-230-24-1
Repair Procedure
Sheppard Auto Plungers
Under normal use, the Sheppard auto plunger system will require no regular maintenance. The auto plunger is
serviceable only as a kit. Sheppard part #18212821K will fit both the cylinder head and bearing cap end of the
steering gear.
TOOLS REQUIRED:
22mm Socket
1/4" Bladed Screwdriver
1/4" Drift Punch
1/8" Pin Punch
Center Punch
Locking Pliers
CYLINDER HEAD REPAIR
1. Place a drain pan under the steering gear. Park the vehicle on a clean, dry surface and set the parking brake.
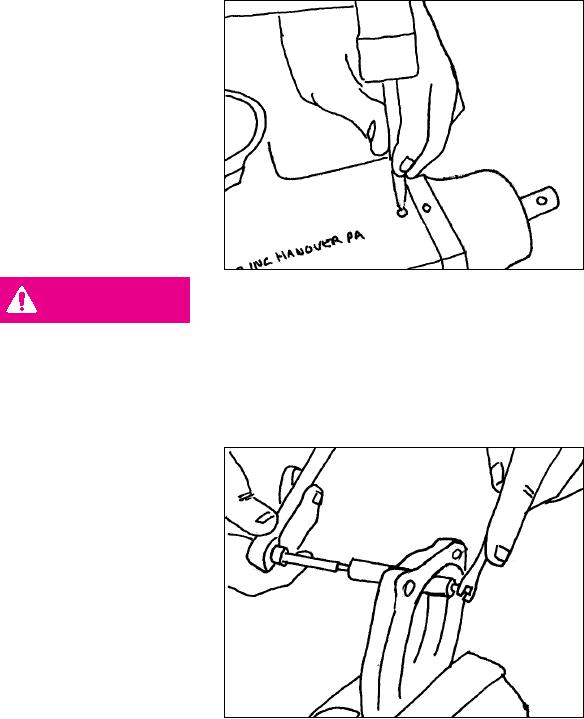
2. Locate the plunger hole in the end cap. Using
the 1/4" punch and hammer, drive the auto
plunger in until it bottoms out in the bore.
Take care to keep the punch straight in the
bore and use only light hammer blows to drive
the auto plunger assembly (Figure 40).
Figure 40
DANGER
FAILURE TO KEEP THE PUNCH STRAIGHT OR HITTING THE PLUNGER
TOO HARD CAN CAUSE DAMAGE TO THE PLUNGER BORE OR AUTO
PLUNGER ASSEMBLY.
3. Mark the cylinder head and housing for reassembly. Remove the four attaching bolts using a 22mm
socket and remove the cylinder head.
4. Place the cylinder head in a vise. The spring
pin, flange and plunger body should be
accessible for removal at this point.
5. Insert the screwdriver into the slotted head of
the plunger body to hold the plunger body in
place. Use the locking pliers to turn the
plunger flange off the plunger body, while
holding the plunger body in place with the
screwdriver.(Figure 41).
Figure 41
K-52