
TM 5-3805-294-23-4
0496
REMOVAL - Continued
10
11
9
17
12
13
7
14
15
5
6
16
8
19
21
20
18
HYEX00114
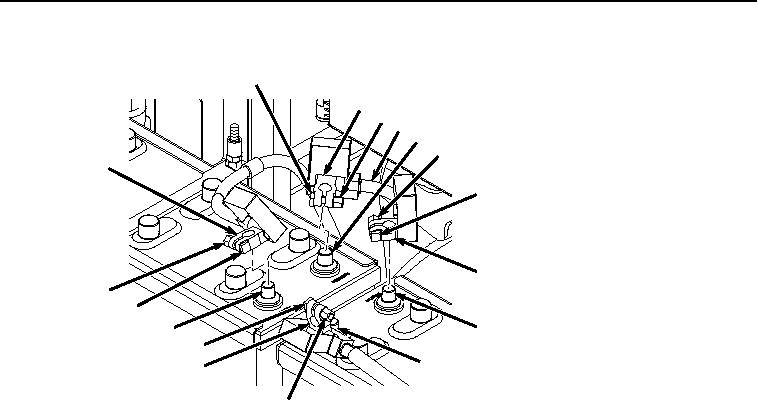
Figure 2.
Battery Cables Removal.
3.
Remove negative battery terminal clamp (Figure 2, Item 7) from negative battery terminal (Figure 2, Item 8).
4.
Loosen nut (Figure 2, Item 9) from screw (Figure 2, Item 10) on positive battery terminal clamp (Figure 2, Item
11).
5.
Remove positive battery terminal clamp (Figure 2, Item 11) from positive battery terminal (Figure 2, Item 12).
6.
Loosen nut (Figure 2, Item 13) from screw (Figure 2, Item 14) on positive battery terminal clamp (Figure 2,
Item 15).
7.
Remove negative battery terminal clamp (Figure 2, Item 15) from negative battery terminal (Figure 2, Item 16)
and remove battery jumper cable (Figure 2, Item 17).
8.
Loosen nut (Figure 2, Item 18) from screw (Figure 2, Item 19) on positive battery terminal clamp (Figure 2,
Item 20).
9.
Remove positive battery terminal clamp (Figure 2, Item 20) from positive battery terminal (Figure 2, Item 21).
NOTE
Note quantity of each type of hardware on screws (Figure 3, Item 4) to ensure proper
installation.
10.
Remove four spacers (Figure 3, Item 22), eight nuts (Figure 3, Item 23), and two washers (Figure 3, Item 24)
from four screws (Figure 3, Item 4).