TM 5-2420-230-24-1
(1)
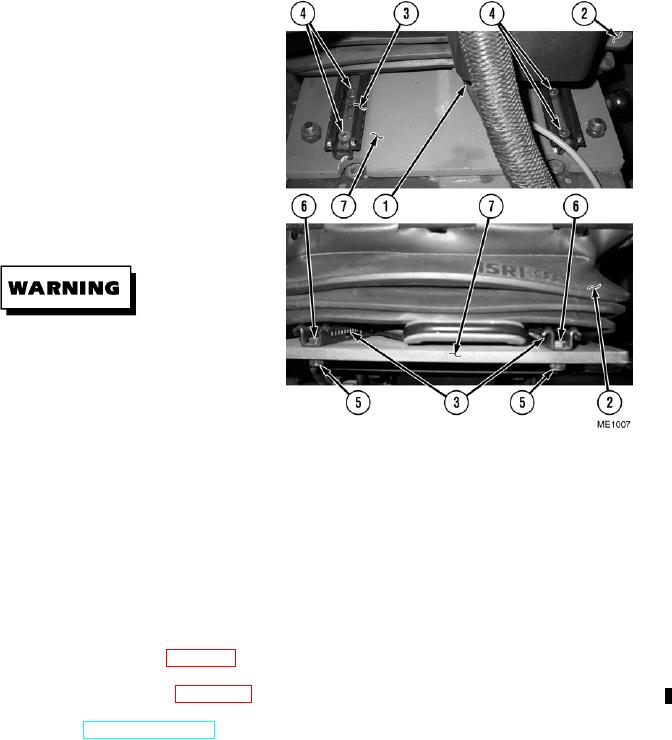
Disconnect air supply line (1).
(2)
Disconnect all wiring connectors.
(3)
Slide seat (2) to foremost position on slides (3)
and remove four screws (4).
(4)
Slide seat (2) to rearmost position on slides (3)
and remove self-locking nuts (5) and screws (6).
Discard self-locking nuts.
(5)
Remove seat (2) from swivel base (7).
b. Installation.
Remove all jewelry such as rings, dog tags,
bracelets, etc. If jewelry or tools contact positive
electrical circuits, a direct short may result.
Damage to equipment and injury or death to
personnel may occur.
(1)
Slide seat (2) fully forward on slides (3).
(2)
Align holes on slides (3) with holes in swivel base (7) and install four screws (4).
(3)
Slide seat (2) to rearmost position on slides (3) and install two screws (6) and two new self-locking nuts (5).
(4)
Connect and tighten air supply line (1).
(5)
Connect all wiring connectors.
c. Follow-On Maintenance.
(1)
Install hand control pod assemblies (Para 13-9).
(1.1) Install operator's seat anchor buckle (Para 13-8.2).
(2)
Functionally test seat (TM 5-2420-230-10).
END OF TASK
Change 1
13-15

